Many have inquired about making sand and gravel filters so I've decided to create a general guide into how to build them. As I've mentioned these filters are top notch when it comes to overall performance, ease of maintence, cost and effiency. In addition I've also stated they are very forgiving in nature and therefore as far as I know of there is no one best way to create them. The idea is very simple. Water enters the filter - waste of different sizes is trapped by the varying sizes of gravel and sand, then finally clean water exits out. Eventually your media (the sand and gravel) becomes clogged, just like any other filter and needs cleaning. At which time you use a shop vac or any other tool which has the ability to push air and you direct the air down a pipe/tube and through a manifold to distribute it. This agitates the waste and the media quickly bringing it to the top of the water colum and out of a waste pipe. Bearing that information in mind - please use my guide for what it is... a guide! These are not the holy directions and can absolutely be tweaked and turned to fit your needs or to try to improve, upgrade or downgrade on my efforts. Let it be known, I didn't even follow exact instructions from how I was taught!

With all that said, there are two constants that must be followed to the best of my knowledge!
1) I mentioned the various layers trap differnt sized debris. Well thats true and false. In most cases your pump impeller is going to chop up a lot of your waste into the same sized particles. Granted they do all clump together and what not but thats besides the point. Mainly, the layers are needed for solid compaction. Ie) Your grate holds up your large stone/crushed stone from going backwards through the pump during any periods when you power off. Then that layer protects the pea gravel from falling through, and that protects the sand from falling through all the way to the bottom. Therefore your need to have some sort of grate to hold up your rocks in the first place and you need the first couple of layers to get to the sand. Sand is what does 99% of the water polishing and fines trapping in these filters so there is no point in trying to skimp on any of the above!
2) A 55 gallon s/g filter is designed to peak out at 2000 gph. Why? Because if you try to flow any more through them the sand begins to fluidize and will flow through your return. Having sand - essentially dirt, mixing with your clean water of course defeats the purpose of having a nice new filter so thats not good. Keeping that in mind you have to consider how strong your pump is realitive to how large you plan to build your s/g.(By all means please do not think you have to make a 55 gallon version)
With a good base level understanding of the s/g. Lets get to building.
I've draw a little diagram of a s/g filter and will describe it and how to put it together per the picture below.

As you can see the bulk of the filter is of course your trash barrel/drum/whatever. For one of our IS members I did some calculations the other day and based upon his needs I came up with basically him requiring a 33% scale of the 55 gallon version. (Which by the way is the most common size for large aquariums and ponds/aquascapes. If the folks require more filtration they just add more s/g's!) For the record 33% of 55 gallons runs about 18 gallons and conviently Home Depot carries two different Rubbermaid trash barrels for $13 and $20 so that seems to work out quite well.
Once you've decided on what kind of vessel you'd like to use for your filter, next you've got to go abouts getting water in and out of it - without having it leak! At first this was challenging to me and one day I was taught how to do it properly. If you are using a 20 gallon barrel or above I'd advise using 2" fittings and then using reducers to size down to whatever your main pipe size will be. Maybe 1 1/2" or 1 1/4"? It depends really on how large your pump fitting is and how much water you plan on pushing through. Anyways, my advise is to recruit a hole saw for the job to get a nice accruate cut. Additionally, unless you have a Harbor Freight or other discount store nearby... don't go out and buy one, find someone to borrow one from. Seriously one of my hole saws and arbor were $40!
Back to the building! To get in and out of the tank as shown on the diagram you will need 2" male and female adapters from the electrical conduit section. Why electrical? Because electrical fittings are straight cut and therefore will screw together very tightly. I won't lie, I don't remember the size hole saw you need for these fittings, so definently measure them first before borrowing and definentlt before buying and cutting the holes. (Better yet, drill a test hole in a scrap piece of wood.. I did that.) When you do drill the holes in your barrel, seal the gaps inside and out with eitiher clear silicone, 3M-5200, or you can use PL Roof/Flashing sealeant. The first two are more regurlaly accepted however... I used silicone FYI. Pay extra attention to the outside of the barrel of course, my witty old saying is "god forbid it leaks on the inside" - haha!
(I used a piece of scrap rubber I had laying around. Totally unnecessary, but I did it because I had it.)
On the diagram you see there are two outlets, a return and a waste. You will want to space these two drains out with the waste drain being lower than the return drain. Why? Because when you are doing a cleanout the water gets pretty violet and bubbly. If you had them both at even height I'd imagine you'd be at a good risk to overflow during the said cleanout so my advice is to just do it like that. For my 55 gallon barrel my return drain is centered (the tip of the drill bit on the hole saw) at 4 inches down and my waste drain is centered at 8 inches down. There is hardly an exact size to it and size most folks will likely make theirs smaller, just use your best guess. Remember there is really no one way to make these things. Your the foreman on this one, your project your rules! You will need to plug your waste drain, since that will be under wate during normal operation. I bought a fitxthreaded fitting and a threaded cap to acheive this. Alternatively there are metal pvc caps that do the trick for a few dollars more, or even better a ball valve. As I was using 2" pipe another ball valve was another $20, so I didn't go that route.
(Here is a shot of the the plugged waste drain (under water) as well as showed the male female adapter from the inside.)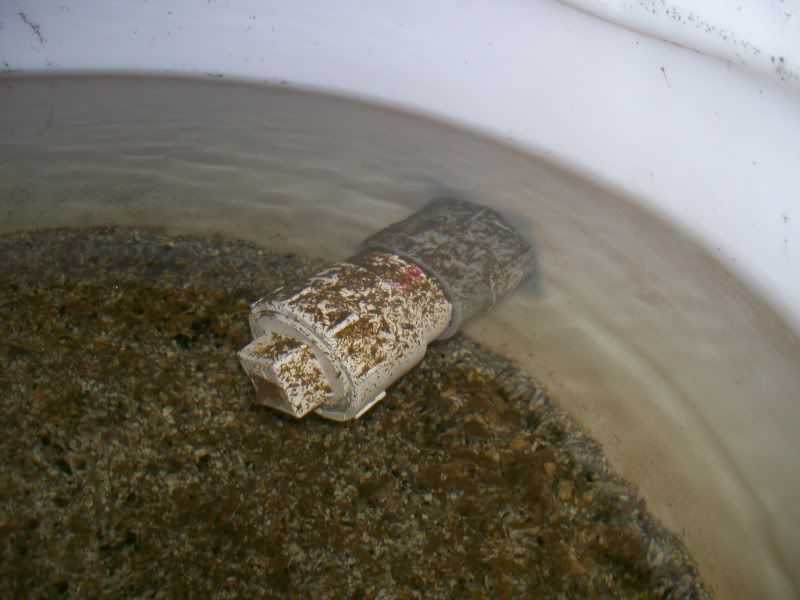
Looking back to the diagram at the bottom of the barrel you see two methods of having water enter your tank. One option is two buy a 2" pvc shower drain and install it right to the bottom of the tank. Essentially you accomplish this the same as you would install the male and female adapters. Use a hole saw (I beleive for the 2" drain it was a 2 1/2" hole... that was the near $40 bit.) The shower drain comes as two pieces, so you just pop one piece through and screw the other on the other side. Two people are good for this part, as the last couple of turns are tricky to get it extra tight. Then just silicone it inside and out really well. I won't use my joke this time as the drain being on the bottom gets a lot of pressure so I'd advocate you pay close attention to inside and out.
Just used latex gloves and smear it everywhere and you'll be fine - trust your handy work!
On the other hand if you'd like you can also use male and female adapters the same way you did for the clean water and waste returns. Just center the hole an intelligent way's up the side of the barrel and install. Which way is best? There is no better way, but you've got to pick one or else your tank will be empty! One reason you may chose one method over the other however would be space constraits so pick what best suits you.
This is the underside of the tank. I used the shower drain method. Looking back I would have just used m/f connectors on the sidewall to avoid using different sized saws.
Next you must start thinking about two things, building your air manifold and also what to use for your support grate to hold up all of your filter media. Again there are many ways to accomplish both so be creative. As far as my grate, I went about making mine using materials I had laying around. For a grate I used plastic lighting fixture grate cut to size and to support that I used a series of 6 or 8 (I forget) small lengths of 3" pieces of PVC. If you do use that method, make sure you get DWV (drain, waste and vent) PVC for this, not actual plumbing PVC. DWV is far less thick and much, much less expensive. Since your just using this for support these no need to have the 'real thing'. On the other hand, I've seen people just use bricks, other random things to support there grates. Additionally, if you are resourceful and can find patio furniture/soccer,hockey goal post pvc you can get really weird 4 and 5 way fittings and actually make your manifold and support stand all in one as I will show in one of my examples. For a grate, as I said my lighting fixture grate works fine and those are cheap. You just need anything to prevent your rocks from falling through.
Your last real build as part of your s/g is making a manifold. Here is a picture of mine along with my grate. It was made out of 1 1/4" PVC which is plenty to carry the air and it's also economical on the pocket. As you can see my design is sort of like a weird steering wheel, but it gets the job done! I've seen other far more creative ones, including those who have harvested the guts from old pool filters. Basically all you need to do is make a device to get air down and distributed as well as possible around the bottom of the tank. Mine was created using a 10' section of 1 1/4" PVC, 4 electrical "long sweeps", 4 end caps and 3 tee's. (Actually it's 2 tee's and a cross but thats because I thought I had another tee at home and didn't... oops.) After glueing that all together (with pvc primer and glue) you drill holes evenly spaced on the bottom of the manifold and try to angle them slightly pointing in twoards the middle. I drilled a couple holes in each glued fitting as well.
My manifold, before the end caps were glued. The grate is behind it.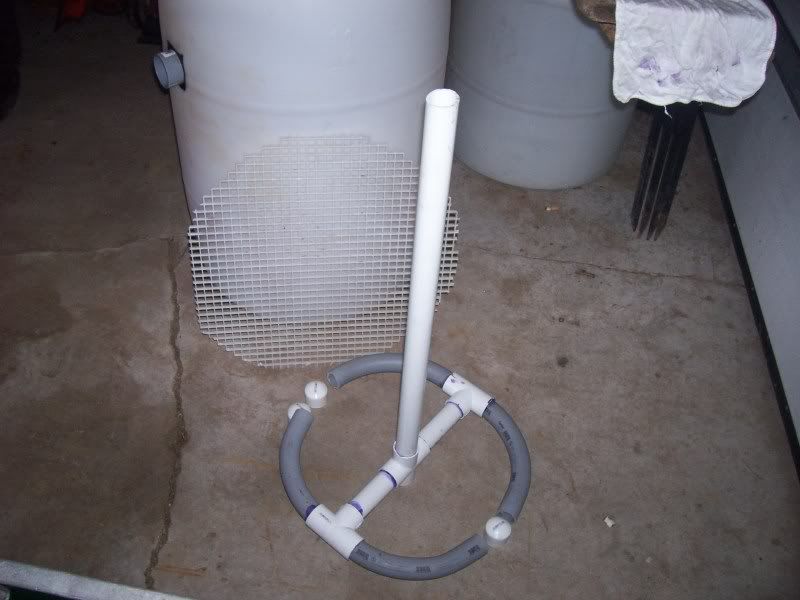
When your satisfied with what you've come up with, throw your support system, grate and manifold all in start dumping some rocks!
What I did first was started with one layer of softball sized rocks I found around my yards. I figured that'd be a good base in case any of the crushed stone was small and wanted to fall through the grate. Afterwards I added 5" of crushed stone. Again, since your filter will likely be 30-50% the size of a 55gal style, just use an intelligent amount! Next comes the peagravel, which I added slightly more of, but again lets just call it 5". Finally the sand and basically the end of your build!
But wait, a discussion on sand? Yes I'm sorry. You can't just buy any old sand. The problem is as I mentioned, sand will fluidize very easily under steady water pressure. Therefore you have two options to overcome this phenomenon. One is use pavers sand, or whats more widely accepted is #8 blasting sand if you can find it. The second option, which I use, is to find a local farm or grain store and buy crushed oyster shell or granite chicken grit. This has the same consistency of the blasting sand, but is made from crushed oyster shell as mentioned. This creates an excellent PH buffer and is beneficial to your system!
Basically this is it! Don't forget this is designed to gravity return back to your tank so your outlet must be higher than your water level. If it weren't you'd be getting less bang from your buck out of your pump anyways!
I'm sure folks may have questions so feel free to reply in the thread or to pm me. Without making folks feel dumb or myself sounding like a broken record I figure this is a darn good starting point for everyone interested in s/g filters! Happy keeping!


